0%

分布式数据库系统架构

1
2
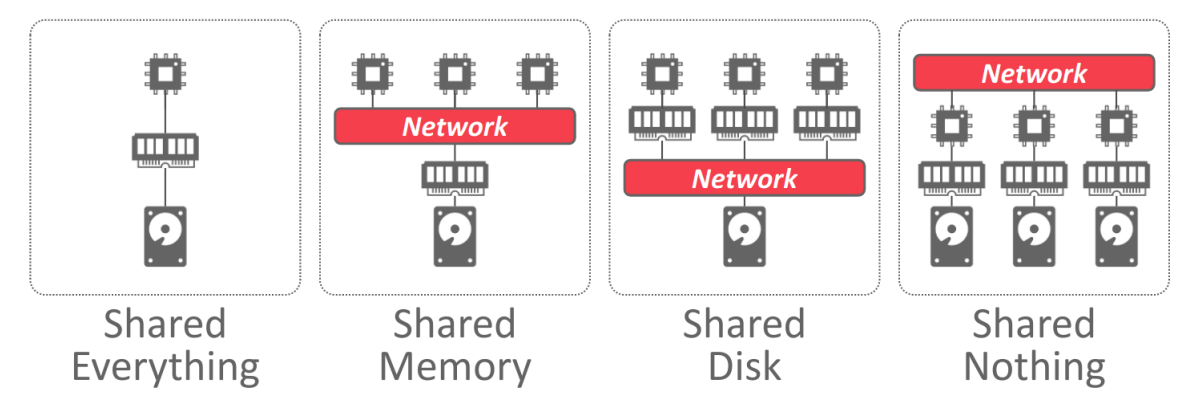
A DBMS’s system architecture specifies what shared resources are directly accessible to CPUs. It affects
how CPUs coordinate with each other and where they retrieve and store objects in the database.

这里的资源主要是指内存,磁盘。单机数据库系统称为shared everything,因为单机节点,有自己独立的内存空间和独立的磁盘。

Shared Memory

现实中并不常见,多个cpu通过网络来共享一个内存地址空间,并且共享同一个disk。

Shared Disk

多个数据库实例,每个实例有自己的内存,但是通过网络共享同一个disk。Shared Disk架构在云原生比较常见,这样的好处就是利于存算分离,计算层和存储层能够解耦,因此计算层和存储层在扩缩容的时候彼此不影响。缺点是因为共享disk,因此对于高并发的写请求势必性能会比较差,因此这种架构比较适合OLAP这种读多写少的数仓。

Shared Nothing

各个数据库实例,都有自己的内存和disk,这些实例之间只能通过网络通信来感知各个实例的状态变化。Share Nothing架构的优点在于性能和效率比较高,缺点在于灵活性较差,
因为扩缩容的时候,需要在节点之间移动数据。而且对于事物的支持性较差,因为各个节点之间必须通过网络进行协调。

为什么需要存算分离

  1. 异构的工作负载:
    得益于现在云原生的环境,用户可以自由配置每台云服务器的cpu型号,内存,磁盘,带宽。
    但是存在的问题是适合高 I/O 带宽、轻计算的系统配置不适合复杂查询,而适合复杂查询的系统配置却不能满足高吞吐的要求。简单的理解为需要在计算和IO之间做平衡。

  2. 扩缩容: 由于计算和存储的耦合,当扩缩容的时候势必需要在节点之间移动数据,而节点同时需要对外提供计算服务,因此此时的性能可能会收到很大影响。如果存储分离,那么计算层和存储层可以独立增加减少节点而互不干扰。

SnowFlake

SnowFlake的架构如下图。

  1. Data Storage : 存储层使用S3
  2. Virtual Warehouses : SnowFlake的计算层,负责执行查询计算。 由多个EC2实例组成,是MPP架构。
  3. Cloud Services : 主要对外提供服务,用户无法感知到VW的存在。维护元数据信息。主要包括database schemas, access control information, encryption keys, usage statistics。

SnowFlake通过VW和S3来将计算和存储分离。整体上来看是使用了Shared Disk架构。但是为了减少VW和S3之间的数据传输,SnowFlake通过本地磁盘做一个cache系统。如果cache系统做的比较好,那么性能上面几乎可以媲美于share nothing架构。

TiDB

TiDB中的核心理念都是源自Spanner。 TiDB将整体架构拆分成了多个模块,各模块之间互相通信,组成完整的 TiDB 系统。对应的架构图如下:

TiDB Server:SQL 层,对外暴露 MySQL 协议的连接 endpoint,负责接受客户端的连接,执行 SQL 解析和优化,最终生成分布式执行计划。TiDB 层本身是无状态的,实践中可以启动多个 TiDB 实例,通过负载均衡组件(如 LVS、HAProxy 或 F5)对外提供统一的接入地址,客户端的连接可以均匀地分摊在多个 TiDB 实例上以达到负载均衡的效果。TiDB Server 本身并不存储数据,只是解析 SQL,将实际的数据读取请求转发给底层的存储节点 TiKV(或 TiFlash)。

PD (Placement Driver) Server:整个 TiDB 集群的元信息管理模块,负责存储每个 TiKV 节点实时的数据分布情况和集群的整体拓扑结构。

TiKV Server:存储数据节点,内部使用Raft一致性协议来维护数据。

TiDB通过在TiDB层实现了计算,在TiKV实现了存储来解耦计算和存储。

ClickHouse

ClickHouse 是一个典型的Shared Nothing架构的分布式数据库,2022年ClickHouse社区的RoadMap中存算分离也是一个大的方向。目前ClickHouse已经支持DiskOss,设想一个可能的方案,类比于SnowFlake,很容易扩展为一个Shared Disk架构。但是还需要完成一个元数据信息的管理功能以支持动态的扩缩容。

参考文献

  1. https://docs.snowflake.com/en/user-guide/intro-key-concepts.html
  2. https://docs.pingcap.com/zh/tidb/dev/tidb-architecture
  3. https://clickhouse.com/docs/en/intro/
  4. https://15445.courses.cs.cmu.edu/fall2021/notes/21-distributed.pdf

ClickHouse中write与merge

write过程

写过程中对应的Processor是MergeTreeSink。
继承关系为

1
MergeTreeSink->SinkToStorage->ExceptionKeepingTransform->IProcessor

其中主要的方法实现在MergeTreeSink::consume()方法中。consume方法的逻辑首先是(1)处将Chunk转化成Block,Block可以看做是Chunk的封装,都是column数据的容器。然后(2)处通过
将整个Block的数据按照分区键来分为多个block,每个block中的数据属于同一个partition。
(3)处通过遍历每个block,然后在(4)处将每个block的数据写入临时文件,也可以理解为临时DataPart。(5)处将每个分区的DataPart放入容器partitions。然后我们看(6)处的finishDelayedChunk方法。

1
2
3
4
5
6
7
8
9
10
11
12
13
14
15
16
17
18
19
20
21
22
23
24
25
26
27
void MergeTreeSink::consume(Chunk chunk)
{
auto block = getHeader().cloneWithColumns(chunk.detachColumns()); //(1)
...
auto part_blocks = storage.writer.splitBlockIntoParts(block, max_parts_per_block, metadata_snapshot, context);//(2)

...

for (auto & current_block : part_blocks) //(3)
{
...
auto temp_part = storage.writer.writeTempPart(current_block, metadata_snapshot, context);//(4)

...

partitions.emplace_back(MergeTreeSink::DelayedChunk::Partition //(5)
{
.temp_part = std::move(temp_part),
.elapsed_ns = elapsed_ns,
.block_dedup_token = std::move(block_dedup_token)
});
}

finishDelayedChunk(); //(6)
delayed_chunk = std::make_unique<MergeTreeSink::DelayedChunk>();
delayed_chunk->partitions = std::move(partitions);
}

finishDelayedChunk方法主要是将各个临时datapart刷到磁盘,然后使用renameTempPartAndAdd将临时DataPart改为正式的名字,最后触发后台merge操作。

1
2
3
4
5
6
7
8
9
10
11
12
13
14
15
16
17
18
19
20
21
22
23
24
void MergeTreeSink::finishDelayedChunk()
{
if (!delayed_chunk)
return;

for (auto & partition : delayed_chunk->partitions)
{
partition.temp_part.finalize(); //(1)

auto & part = partition.temp_part.part;

/// Part can be deduplicated, so increment counters and add to part log only if it's really added
//(2)
if (storage.renameTempPartAndAdd(part, context->getCurrentTransaction().get(), &storage.increment, nullptr, storage.getDeduplicationLog(), partition.block_dedup_token))
{
PartLog::addNewPart(storage.getContext(), part, partition.elapsed_ns);

/// Initiate async merge - it will be done if it's good time for merge and if there are space in 'background_pool'.
storage.background_operations_assignee.trigger(); //(3)
}
}

delayed_chunk.reset();
}

merge过程

在介绍merge过程中,首先介绍两个线程池。
BackgroundSchedulePool和MergeTreeBackgroundExecutor。因为merge操作是异步的,相关的任务会在个线程池中实现。

BackgroundSchedulePool

可以看到BackgroundSchedulePoo中的线程为ThreadFromGlobalPool,所以其实任务都是在全局的线程池中执行的。在本系列的第一篇文章中讲过ClickHouse中的全局线程池。

1
2
3
4
5
6
7
8
9
10
11
12
13
14
15
16
17
18
19
20
21
22
23
24
25
26
27
28
29
class BackgroundSchedulePool
{
public:
...
private:
using Threads = std::vector<ThreadFromGlobalPool>;

void threadFunction(); //worker函数
void delayExecutionThreadFunction();

Threads threads; //线程队列
Poco::NotificationQueue queue; //任务队列

};

void BackgroundSchedulePool::threadFunction()
{
...
while (!shutdown)
{
...
if (Poco::AutoPtr<Poco::Notification> notification = queue.waitDequeueNotification(wait_timeout_ms))
{
TaskNotification & task_notification = static_cast<TaskNotification &>(*notification);
task_notification.execute();
}
}
}

MergeTreeBackgroundExecutor

MergeTreeBackgroundExecutor有两个任务队列,pending和active,pending表示待执行的tasks,而active表示正在执行的tasks。MergeTreeBackgroundExecutor被实现为coroutine,原注释为

1
2
3
Executor for a background MergeTree related operations such as merges, mutations, fetches an so on.
* It can execute only successors of ExecutableTask interface.
* Which is a self-written coroutine. It suspends, when returns true from executeStep() method.

任务队列的实现为类MergeMutateRuntimeQueue,可以理解为一个优先级队列,因为在执行merge的时候,ClickHouse的策略认为应该先merge小DataPart来提高系统性能。

1
2
3
4
5
6
7
8
9
10
11
12
13
14
15
16
17
18
19
20
21
22
23
24
25
26
27
28
29
30
31
32
33
34
35
36
37
template <class Queue>
class MergeTreeBackgroundExecutor final : public shared_ptr_helper<MergeTreeBackgroundExecutor<Queue>>
{
public:
...
bool trySchedule(ExecutableTaskPtr task);
private:

void routine(TaskRuntimeDataPtr item);
void threadFunction(); //worker函数

Queue pending{}; //任务队列
boost::circular_buffer<TaskRuntimeDataPtr> active{0}; //任务队列

ThreadPool pool; //线程池
};


template <class Queue>
void MergeTreeBackgroundExecutor<Queue>::threadFunction()
{
...

while (true)
{
try
{

...
routine(std::move(item)); //routine函数中会调用task->executeStep
}
catch (...)
{
tryLogCurrentException(__PRETTY_FUNCTION__);
}
}
}

调用关系

上面讲到在方法finishDelayedChunk的最后通过调用storage.background_operations_assignee.trigger()触发merge。trigger方法中通过
BackgroundSchedulePool::TaskHolder(holder是在BackgroundJobsAssignee::start方法中初始化的)来向BackgroundSchedulePool提交任务。任务函数如下,merge的任务类型为DataProcessing。因此最后一定会有某个线程执行了threadFunc函数。

1
2
3
4
5
6
7
8
9
10
11
12
13
14
15
16
17
void BackgroundJobsAssignee::threadFunc()
try
{
bool succeed = false;
switch (type)
{
case Type::DataProcessing:
succeed = data.scheduleDataProcessingJob(*this);
break;
case Type::Moving:
succeed = data.scheduleDataMovingJob(*this);
break;
}

if (!succeed)
postpone();
}

具体来看scheduleDataProcessingJob函数

1
2
3
4
5
6
7
8
9
10
11
12
13
14
15
16
17
18
19
20
21
22
23
24
25
26
27
28
29
30
31
32
33
34
35
36
37
38
39
40
bool StorageMergeTree::scheduleDataProcessingJob(BackgroundJobsAssignee & assignee) //-V657
{
if (shutdown_called)
return false;

...
auto metadata_snapshot = getInMemoryMetadataPtr();
std::shared_ptr<MergeMutateSelectedEntry> merge_entry, mutate_entry;
bool were_some_mutations_skipped = false;

auto share_lock = lockForShare(RWLockImpl::NO_QUERY, getSettings()->lock_acquire_timeout_for_background_operations);

MergeTreeTransactionHolder transaction_for_merge;
MergeTreeTransactionPtr txn;
if (transactions_enabled.load(std::memory_order_relaxed))
{
/// TODO Transactions: avoid beginning transaction if there is nothing to merge.
txn = TransactionLog::instance().beginTransaction();
transaction_for_merge = MergeTreeTransactionHolder{txn, /* autocommit = */ true};
}
...
{
...
merge_entry = selectPartsToMerge(metadata_snapshot, false, {}, false, nullptr, share_lock, lock, txn);
...

}

...

if (merge_entry)
{
auto task = std::make_shared<MergePlainMergeTreeTask>(*this, metadata_snapshot, false, Names{}, merge_entry, share_lock, common_assignee_trigger);
task->setCurrentTransaction(std::move(transaction_for_merge), std::move(txn));
assignee.scheduleMergeMutateTask(task);
return true;
}

....
}

selectPartsToMerge

1
2
3
4
5
6
7
8
9
10
11
12
13
14
15
16
17
18
19
20
21
22
23
24
25
26
27
28
29
30
31
32
33
34
35
36
37
38
39
40
41
42
43
44
45
46
47
48
49
50
51
52
53
54
55
56
57
58
59
60
61
62
63
64
65
66
67
68
69
70
71
72
73
74
75
76
77
std::shared_ptr<MergeMutateSelectedEntry> StorageMergeTree::selectPartsToMerge(
const StorageMetadataPtr & metadata_snapshot,
bool aggressive,
const String & partition_id,
bool final,
String * out_disable_reason,
TableLockHolder & /* table_lock_holder */,
std::unique_lock<std::mutex> & lock,
const MergeTreeTransactionPtr & txn,
bool optimize_skip_merged_partitions,
SelectPartsDecision * select_decision_out)
{
auto data_settings = getSettings();

auto future_part = std::make_shared<FutureMergedMutatedPart>();

if (storage_settings.get()->assign_part_uuids)
future_part->uuid = UUIDHelpers::generateV4();

auto can_merge = [this, &lock](const DataPartPtr & left, const DataPartPtr & right, const MergeTreeTransaction * tx, String *) -> bool
{
if (tx)
{
/// Cannot merge parts if some of them are not visible in current snapshot
/// TODO Transactions: We can use simplified visibility rules (without CSN lookup) here
if (left && !left->version.isVisible(tx->getSnapshot(), Tx::EmptyTID))
return false;
if (right && !right->version.isVisible(tx->getSnapshot(), Tx::EmptyTID))
return false;

/// Do not try to merge parts that are locked for removal (merge will probably fail)
if (left && left->version.isRemovalTIDLocked())
return false;
if (right && right->version.isRemovalTIDLocked())
return false;
}

/// This predicate is checked for the first part of each range.
/// (left = nullptr, right = "first part of partition")
if (!left)
return !currently_merging_mutating_parts.count(right);
return !currently_merging_mutating_parts.count(left) && !currently_merging_mutating_parts.count(right)
&& getCurrentMutationVersion(left, lock) == getCurrentMutationVersion(right, lock) && partsContainSameProjections(left, right);
};

SelectPartsDecision select_decision = SelectPartsDecision::CANNOT_SELECT;

if (partition_id.empty())
{
UInt64 max_source_parts_size = merger_mutator.getMaxSourcePartsSizeForMerge();
bool merge_with_ttl_allowed = getTotalMergesWithTTLInMergeList() < data_settings->max_number_of_merges_with_ttl_in_pool;

/// TTL requirements is much more strict than for regular merge, so
/// if regular not possible, than merge with ttl is not also not
/// possible.
if (max_source_parts_size > 0)
{
select_decision = merger_mutator.selectPartsToMerge(
future_part,
aggressive,
max_source_parts_size,
can_merge,
merge_with_ttl_allowed,
txn,
out_disable_reason);
}
else if (out_disable_reason)
*out_disable_reason = "Current value of max_source_parts_size is zero";
}
else
{
...
}
...
merging_tagger = std::make_unique<CurrentlyMergingPartsTagger>(future_part, MergeTreeDataMergerMutator::estimateNeededDiskSpace(future_part->parts), *this, metadata_snapshot, false);
return std::make_shared<MergeMutateSelectedEntry>(future_part, std::move(merging_tagger), MutationCommands::create());
}

merger_mutator.selectPartsToMerge为方法,逻辑主要为遍历目前的所以可见的DataPart(事务),这里需要注意的是,ClickHouse在内存中以索引的形式维护这些DataPart信息,因此这些读出来的DataPart是有序的,排序根据(partition_id, min_block, max_block, level, mutation)。

结合merger_mutator.selectPartsToMerge方法和 can_merge方法总结
能够Merge的DataPart需要满足如下条件:

  1. 首先能够merge的DataPart必须是同一个分区,且是连续的。
  2. 使用事务时候,DataPart是同时可见的
  3. 待更正的mutation版本是一致的。

因为每次可以Merge的DataPart数量是有限制的,因此还需要在所有可以合并的DataPart中选择最合适的Range来合并。实现在如下方法中,是一种启发式算法,有兴趣的同学可以研究一下。

1
2
3
PartsRange select(
const PartsRanges & parts_ranges,
size_t max_total_size_to_merge)
1
MergeTreeDataMergerMutator::selectPartsToMerge

这里大约概括下选择parts的策略,里面还有很多细节。感兴趣的同学可以去研读代码

merge的执行

上面说到,在选完待merge的parts后,那么如何把这些part,merge起来呢。构建了一个MergePlainMergeTreeTask,然后通过assignee.scheduleMergeMutateTask方法最终将task加入到MergeTreeBackgroundExecutor的pending队列里。由上述讲过的ergeTreeBackgroundExecutor的执行逻辑,最终会执行MergePlainMergeTreeTask的executeStep,executeStep函数返回true说明还需要再次执行,那么这个任务执行完executeStep后还会放回到penging队列里。

1
2
3
4
5
6
7
8
9
10
11
12
13
14
15
16
17
18
19
20
21
22
23
24
25
26
27
28
29
30
31
32
33
34
35
36
37
38
39
40
41
42
43
44
45
46
47
48
49
50
51
52
53
54
55
56
57
58
59
60
bool MergePlainMergeTreeTask::executeStep()
{
...
switch (state)
{
case State::NEED_PREPARE :
{
prepare();
state = State::NEED_EXECUTE;
return true;
}
case State::NEED_EXECUTE :
{
try
{
if (merge_task->execute())
return true;

state = State::NEED_FINISH;
return true;
}
catch (...)
{
write_part_log(ExecutionStatus::fromCurrentException());
throw;
}
}
...
return false;
}


void MergePlainMergeTreeTask::prepare()
{
future_part = merge_mutate_entry->future_part;
stopwatch_ptr = std::make_unique<Stopwatch>();

const Settings & settings = storage.getContext()->getSettingsRef();
merge_list_entry = storage.getContext()->getMergeList().insert(
storage.getStorageID(),
future_part,
settings);

...

merge_task = storage.merger_mutator.mergePartsToTemporaryPart(
future_part,
metadata_snapshot,
merge_list_entry.get(),
{} /* projection_merge_list_element */,
table_lock_holder,
time(nullptr),
storage.getContext(),
merge_mutate_entry->tagger->reserved_space,
deduplicate,
deduplicate_by_columns,
storage.merging_params,
txn);
}

根据状态会首先执行prepare,prepare中调用的mergePartsToTemporaryPart方什么都没做,只是构造了一个MergeTask对象并返回。等到下次在执行这个task的时候,根据状态会继续执行mergeTask->execute方法,也就是会首先执行prepare方法然后执行executeImpl方法

1
2
3
4
5
6
7
8
9
10
11
12
13
14
15
16
17
18
19
20
using ExecuteAndFinalizeHorizontalPartSubtasks = std::array<std::function<bool()>, 2>;

ExecuteAndFinalizeHorizontalPartSubtasks subtasks
{
[this] () { return prepare(); },
[this] () { return executeImpl(); }
};

ExecuteAndFinalizeHorizontalPartSubtasks::iterator subtasks_iterator = subtasks.begin();

bool MergeTask::ExecuteAndFinalizeHorizontalPart::execute()
{
assert(subtasks_iterator != subtasks.end());
if ((*subtasks_iterator)())
return true;

/// Move to the next subtask in an array of subtasks
++subtasks_iterator;
return subtasks_iterator != subtasks.end();
}

prepare方法中做了许多检查和准备工作然后写入context中,比如检查新part名字是否重合,磁盘空间是否满足,以及各个DataPar方式等等,最重要的两个方法是chooseMergeAlgorithm以及createMergedStream

1
2
3
4
5
6
7
8
9
10
11
12
13
14
15
16
17
18
19
20
21
22
23
24
25
26
27
28
29
30
31
32
33
34
35
36
37
38
39
40
41
42
43
44
45
46
47
48
49
50
51
52
53
54
55
56
57
bool MergeTask::ExecuteAndFinalizeHorizontalPart::prepare()
{
...

global_ctx->chosen_merge_algorithm = chooseMergeAlgorithm();


switch (global_ctx->chosen_merge_algorithm)
{
case MergeAlgorithm::Horizontal :
{
global_ctx->merging_columns = global_ctx->storage_columns;
global_ctx->merging_column_names = global_ctx->all_column_names;
global_ctx->gathering_columns.clear();
global_ctx->gathering_column_names.clear();
break;
}
case MergeAlgorithm::Vertical :
{
ctx->rows_sources_file = createTemporaryFile(ctx->tmp_disk->getPath());
ctx->rows_sources_uncompressed_write_buf = ctx->tmp_disk->writeFile(fileName(ctx->rows_sources_file->path()), DBMS_DEFAULT_BUFFER_SIZE, WriteMode::Rewrite, global_ctx->context->getWriteSettings());
ctx->rows_sources_write_buf = std::make_unique<CompressedWriteBuffer>(*ctx->rows_sources_uncompressed_write_buf);

MergeTreeDataPartInMemory::ColumnToSize local_merged_column_to_size;
for (const MergeTreeData::DataPartPtr & part : global_ctx->future_part->parts)
part->accumulateColumnSizes(local_merged_column_to_size);

ctx->column_sizes = ColumnSizeEstimator(
std::move(local_merged_column_to_size),
global_ctx->merging_column_names,
global_ctx->gathering_column_names);

break;
}
default :
throw Exception("Merge algorithm must be chosen", ErrorCodes::LOGICAL_ERROR);
}


createMergedStream();

global_ctx->to = std::make_shared<MergedBlockOutputStream>(
global_ctx->new_data_part,
global_ctx->metadata_snapshot,
global_ctx->merging_columns,
MergeTreeIndexFactory::instance().getMany(global_ctx->metadata_snapshot->getSecondaryIndices()),
ctx->compression_codec,
global_ctx->txn,
/*reset_columns=*/ true,
ctx->blocks_are_granules_size,
global_ctx->context->getWriteSettings());

...

/// This is the end of preparation. Execution will be per block.
return false;
}

createMergedStream其实就是构建一个QueryPipeline,有多少个DataPart就有多少个ISource,然后添加一个mergeTransform。看到PullingPipelineExecutor有没有很熟悉,在本系列的文章<<ClickHouse中Pipeline的执行>>中说过,PullingPipelineExecutor是执行pipeline的起点。

1
2
3
4
5
6
7
8
9
10
11
12
13
14
15
16
17
18
19
20
21
22
23
24
25
26
27
28
29
30
31
32
33
34
35
36
37
38
39
40
41
42
43
44
45
46
47
48
49
50
51
52
53
54
55
56
57
void MergeTask::ExecuteAndFinalizeHorizontalPart::createMergedStream()
{
/** Read from all parts, merge and write into a new one.
* In passing, we calculate expression for sorting.
*/
Pipes pipes;

...
for (const auto & part : global_ctx->future_part->parts)
{
auto input = std::make_unique<MergeTreeSequentialSource>(
*global_ctx->data, global_ctx->storage_snapshot, part, global_ctx->merging_column_names, ctx->read_with_direct_io, true);

...
//
if (global_ctx->metadata_snapshot->hasSortingKey())
{
pipe.addSimpleTransform([this](const Block & header)
{
return std::make_shared<ExpressionTransform>(header, global_ctx->metadata_snapshot->getSortingKey().expression);
});
}

pipes.emplace_back(std::move(pipe));
}

...
//根据存储引擎的不同,选择不同的mergeTransform
switch (ctx->merging_params.mode)
{
case MergeTreeData::MergingParams::Ordinary:
merged_transform = std::make_shared<MergingSortedTransform>(
header, pipes.size(), sort_description, merge_block_size, 0, ctx->rows_sources_write_buf.get(), true, ctx->blocks_are_granules_size);
break;

case MergeTreeData::MergingParams::Collapsing:
merged_transform = std::make_shared<CollapsingSortedTransform>(
header, pipes.size(), sort_description, ctx->merging_params.sign_column, false,
merge_block_size, ctx->rows_sources_write_buf.get(), ctx->blocks_are_granules_size);
break;

case MergeTreeData::MergingParams::Summing:
merged_transform = std::make_shared<SummingSortedTransform>(
header, pipes.size(), sort_description, ctx->merging_params.columns_to_sum, partition_key_columns, merge_block_size);
break;

...
}

auto res_pipe = Pipe::unitePipes(std::move(pipes));
res_pipe.addTransform(std::move(merged_transform));

...

global_ctx->merged_pipeline = QueryPipeline(std::move(res_pipe));
global_ctx->merging_executor = std::make_unique<PullingPipelineExecutor>(global_ctx->merged_pipeline); //
}

那么executeImpl函数就很简单了就是执行QueryPipeline(1)处,之前文章讲过PullingPipelineExecutor->pull是pipeline执行的起点。

1
2
3
4
5
6
7
8
9
bool MergeTask::ExecuteAndFinalizeHorizontalPart::executeImpl()
{
Block block;
if (!ctx->is_cancelled() && (global_ctx->merging_executor->pull(block))) //(1)
{
...

return false;
}

总结

整体过程概括来说,执行写入Pipeline时,最终执行的核心方法是在MergeTreeSink类consume方法中,首先将写入的数据按分区分成多个Block,然后针对每个Block形成一个DataPart并写入临时文件,然后刷盘到disk,最后通过改名字使得临时DataPart生效。然后触发后台merge。merge的过程其实大体分为两部分,首先是选择能够merge的Datapart,其次是真正的构建流水线来将不同的DataPart合起来。

:整个过程省略了很多细节,只是讲解了大体上的执行过程和逻辑,如果全部展开的话,内容实在是太多了。比方其中涉及到的DataPart事务transaction,选择DataPart的启发式算法以及MergeTransorm的执行。后续会写些文章慢慢补充完善。

MergeTree存储引擎

数据存储

以表hits_v1 为例,它的数据目录如下所示。

1
2
3
4
5
6
7
8
9
10
11
12
13
14
15
16
17
18
19
20
21
22
23
24
25
26
27
28
29
30
31
32
33
34
35
36
.
├── 197506_32_85_11
│   ├── checksums.txt
│   ├── columns.txt
│   ├── count.txt
│   ├── data.bin
│   ├── data.mrk3
│   ├── default_compression_codec.txt
│   ├── minmax_EventDate.idx
│   ├── partition.dat
│   └── primary.idx
├── 201403_1_31_2
│   ├── AdvEngineID.bin
│   ├── AdvEngineID.mrk2
│   ├── Age.bin
│   ├── Age.mrk2
│   ├── BrowserCountry.bin
│   ├── BrowserCountry.mrk2
│   ├── BrowserLanguage.bin
│   ├── BrowserLanguage.mrk2
... ...
│   ├── minmax_EventDate.idx
... ...
├── 202204_109_109_0
│   ├── checksums.txt
│   ├── columns.txt
│   ├── count.txt
│   ├── data.bin
│   ├── data.mrk3
│   ├── default_compression_codec.txt
│   ├── minmax_EventDate.idx
│   ├── partition.dat
│   └── primary.idx
├── detached
├── format_version.txt
└── temp.text

可以看到,上面显示了3个Datapart,DataPart197506_32_85_11和202204_109_109_0的数据组织方式是Compact,而201403_1_31_2的数拒组织方式是Wide。两种方式主要区别在于Compact方式的所有列数据存放在一个Data.bin文件中,而Wide方式中则是每一个列有一个columnsName.bin文件对应。
visits_v1: ClickHouse的每个表都会在其设置的数据目录下有个目录文件对应。

197506_32_85_11,201403_1_6_1,202204_109_109_0:分区目录,hits_v1的分区键为StartDate字段的年月(PARTITION BY toYYYYMM(StartDate))

分区目录的格式为partionKey_minBlock_maxBlock_level。level表示的是合并的次数。每个形如partionKey_minBlock_maxBlock_level的目录下的所有文件构成一个DataPart。每个datapart大小有个上限,并不能一直合并。

primary.idx:主键索引文件,用于存放稀疏索引的数据。通过查询条件与稀疏索引能够快速的过滤无用的数据,减少需要加载的数据量。

{column}.bin:列数据的存储文件,以列名+bin为文件名,默认设置采用 lz4 压缩格式。Wide模式下每一列都会有单独的文件。(还有compact模式,所有的列数据文件合并成一个data.bin)

{column}.mrk2:列数据的标记信息,记录了数据块在 bin 文件中的偏移量。标记文件首先与列数据的存储文件对齐,记录了某个压缩块在 bin 文件中的相对位置;其次与索引文件对齐,记录了稀疏索引对应数据在列存储文件中的位置.(compact模式下只有一个data.mrk3文件)

minmax_EventDate.idx: 分区键的minmax索引文件。
columns.txt:列名以及数据类型

count.txt:记录数据的总行数。
注意:可能会有读者有疑惑,mark存在的意义在哪,为什么不可以直接通过primary.idx直接索引到.bin数据文件。笔者认为,为了加快数据的查询效率,ClickHouse中的primary索引是常驻内存的,因此需要尽量较少主键索引的大小,而如果没有mark文件,那么势必主键索引中需要记录目前mark文件中有关.bin文件的偏移信息,会造成内存压力。

主键索引

具体的以官方文档为例。

1
2
3
4
5
6
全部数据  :     [-------------------------------------------------------------------------]
CounterID: [aaaaaaaaaaaaaaaaaabbbbcdeeeeeeeeeeeeefgggggggghhhhhhhhhiiiiiiiiikllllllll]
Date: [1111111222222233331233211111222222333211111112122222223111112223311122333]
标记: | | | | | | | | | | |
a,1 a,2 a,3 b,3 e,2 e,3 g,1 h,2 i,1 i,3 l,3
标记号: 0 1 2 3 4 5 6 7 8 9 10

如果指定查询如下:

  1. CounterID in (‘a’, ‘h’),服务器会读取标记号在 [0, 3) 和 [6, 8) 区间中的数据。
  2. CounterID IN (‘a’, ‘h’) AND Date = 3,服务器会读取标记号在 [1, 3) 和 [7, 8) 区间中的数据。
  3. Date = 3,服务器会读取标记号在 [1, 10] 区间中的数据。

主键索引与mark文件的生成
简单的解释就是:ClickHouse 会根据 index_granularity 的设置将数据分成多个 granule,每个 granule 中索引列的第一个记录将作为索引写入到 primary.idx;其他非索引列也会用相同的策略生成一条 mark 数据写入相应的*.mrk2 文件中,并与主键索引一一对应,并记录该条索引对应的记录列在column中的偏移(偏移是个抽象的概念,具体的.bin数据文件需要压缩存放,而压缩存放有具体为的一系列的数据块,可以理解为(块号:块内偏移)这个放到后序ClickHouse插入数据的文章中详细讲解)

跳数索引

1
INDEX index_name expr TYPE type(...) GRANULARITY granularity_value

跳数索引可以理解为索引的索引。将mark文件中每隔granularity_value个值,进行索引。
可用的索引类型

  1. 有minmax 存储指定表达式的极值
  2. set(max_rows) 存储指定表达式的不重复值
  3. ngrambf_v1(n, size_of_bloom_filter_in_bytes, number_of_hash_functions, random_seed)存储一个包含数据块中所有 n元短语(ngram) 的 布隆过滤器
  4. tokenbf_v1(size_of_bloom_filter_in_bytes, number_of_hash_functions, random_seed)跟 ngrambf_v1 类似,但是存储的是token而不是ngrams
  5. bloom_filter(bloom_filter([false_positive]) – 为指定的列存储布隆过滤器

SELECT读数据

SELECT读数据主要分为两三部分,如下图所示。

  1. 首先通过分区和一系列索引来排除不需要扫描的datapart和Mark(getAnalysisResult)
  2. 将待扫描的DataPart划分为更细粒度的ThreadTask,并尽量将不同的磁盘负载分配到不同的线程中去以达到磁盘最大的并行化。(spreadMarkRangesAmongStreams)。
  3. PIPELINE执行时,真正的调度线程拉取markRage(getTask)并从文件中读取数据(readRows)

1
2
3
4
5
6
7
8
9
10
11
12
13
14
15
16
17
18
void ReadFromMergeTree::initializePipeline(QueryPipelineBuilder & pipeline, const BuildQueryPipelineSettings &)
{
auto result = getAnalysisResult();
if (select.final())
{
...
}
else if ((settings.optimize_read_in_order || settings.optimize_aggregation_in_order) && input_order_info)
{
...
}
else
{
pipe = spreadMarkRangesAmongStreams(
std::move(result.parts_with_ranges),
column_names_to_read);
}
}

分析需要扫描的mark

上一篇文章《ClickHouse的QueryPlan到Pipeline的翻译》中讲述了ClickHouse是如何从queryPlan转化为pipeline,而读数据的第一部分就是在构建pipeline时候做的(IsourceStep.updatePipeline),调用栈如下。


下面主要详细讲解几个核心函数

getAnalysisResult->selectRangestoRead()。selectRangestoRead中会分别调用
MergeTreeDataSelectExecutor::filterPartsByVirtualColumns();
virtualColumn的官网定义如下,一般情况下我们不会使用到它。

1
2
3
4
5
6
7
Virtual column is an integral table engine attribute that is defined in the engine source code.

You shouldn’t specify virtual columns in the CREATE TABLE query and you can’t see them in SHOW CREATE TABLE and DESCRIBE TABLE query results. Virtual columns are also read-only, so you can’t insert data into virtual columns.

To select data from a virtual column, you must specify its name in the SELECT query. SELECT * does not return values from virtual columns.

If you create a table with a column that has the same name as one of the table virtual columns, the virtual column becomes inaccessible. We do not recommend doing this. To help avoid conflicts, virtual column names are usually prefixed with an underscore.

virtual columns的常用值如下

1
2
3
4
5
6
_part  -- name of a part
_part_index -- sequential index of the part in the query result
_partition_id -- name of a partition
_part_uuid -- unique part identifier, if enabled `MergeTree` setting `assign_part_uuids` (Part movement between shards)
_partition_value -- values (tuple) of a `partition by` expression
_sample_factor -- sample_factor from the query

MergeTreeDataSelectExecutor::filterPartsByPartition(),会调用selectPartstoRead.
其中(1)处的part_values是filterPartsByVirtualColumns方法返回的结果,因此在遍历每一个part判断他的partition key是否满足要求之前,可以通过其名字是否在part_values中来筛选一下。代码(2)处是真正来判断该datapart的partion key是否满足要求。

1
2
3
4
5
6
7
8
9
10
11
12
13
14
15
16
17
18
19
20
21
22
23
24
25
26
27
28
void MergeTreeDataSelectExecutor::selectPartsToRead(
MergeTreeData::DataPartsVector & parts,
const std::optional<std::unordered_set<String>> & part_values,
const std::optional<KeyCondition> & minmax_idx_condition,
const DataTypes & minmax_columns_types,
std::optional<PartitionPruner> & partition_pruner,
const PartitionIdToMaxBlock * max_block_numbers_to_read,
PartFilterCounters & counters)
{
MergeTreeData::DataPartsVector prev_parts;
std::swap(prev_parts, parts);
for (const auto & part_or_projection : prev_parts)
{
const auto * part = part_or_projection->isProjectionPart() ? part_or_projection->getParentPart() : part_or_projection.get();
if (part_values && part_values->find(part->name) == part_values->end()) //(1)
continue;

...
if (partition_pruner)
{
if (partition_pruner->canBePruned(*part)) //(2)
continue;
}


parts.push_back(part_or_projection);
}
}

MergeTreeDataSelectExecutor::filterPartsByPrimaryKeyAndSkipIndexes()

filterPartsByPrimaryKeyAndSkipIndexes方法整体上并不复杂,大部分代码是方法process_part的函数体(1)处。然后在(4)处创新一个新的线程池,并在(5)处向线程池中提交任务,也就是说会有num_threads个线程会执行process_part方法。

具体来看process_part方法。(2)处markRangesFromPKRange方法是通过主键筛选,(3)处的
useful_indices是跳数索引。

1
2
3
4
5
6
7
8
9
10
11
12
13
14
15
16
17
18
19
20
21
22
23
24
25
26
27
28
29
30
31
32
33
34
35
36
37
38
39
40
41
42
43
44
45
46
47
48
49
50
51
52
53
54
55
56
57
58
59
60
61
62
63
64
65
66
67
68
69
70
RangesInDataParts MergeTreeDataSelectExecutor::filterPartsByPrimaryKeyAndSkipIndexes(
MergeTreeData::DataPartsVector && parts,
StorageMetadataPtr metadata_snapshot,
const SelectQueryInfo & query_info,
const ContextPtr & context,
const KeyCondition & key_condition,
const MergeTreeReaderSettings & reader_settings,
Poco::Logger * log,
size_t num_streams,
ReadFromMergeTree::IndexStats & index_stats,
bool use_skip_indexes)
{
...
/// Let's find what range to read from each part.
{

auto process_part = [&](size_t part_index) //(1)函数定义 process_part
{
auto & part = parts[part_index];

RangesInDataPart ranges(part, part_index);

size_t total_marks_count = part->index_granularity.getMarksCountWithoutFinal();

if (metadata_snapshot->hasPrimaryKey())
ranges.ranges = markRangesFromPKRange(part, metadata_snapshot, key_condition, settings, log); //(2)
else if (total_marks_count)
ranges.ranges = MarkRanges{MarkRange{0, total_marks_count}};

sum_marks_pk.fetch_add(ranges.getMarksCount(), std::memory_order_relaxed);


for (auto & index_and_condition : useful_indices) //(3)
{
...
}

...
parts_with_ranges[part_index] = std::move(ranges);

}
}; //函数结束

size_t num_threads = std::min(size_t(num_streams), parts.size());

if (num_threads <= 1)
{
...
}
else
{
/// Parallel loading of data parts.
ThreadPool pool(num_threads); //(4)

for (size_t part_index = 0; part_index < parts.size(); ++part_index)
pool.scheduleOrThrowOnError([&, part_index, thread_group = CurrentThread::getGroup()] //(5)
{
if (thread_group)
CurrentThread::attachToIfDetached(thread_group);

process_part(part_index); //(6)
});

pool.wait();
}

}

return parts_with_ranges;
}

具体来看markRangesFromPKRange方法,(1)处方法定义了判断一个MarkRange里是否可能含有满足条件的数据,可能则返回真,否则返回false。(2)处代码,首先将整个datapart的mark放入栈中,然后来判断全部的markRange有没有可能含有目标列。如果没有则直接排除掉(3)。如果可能含有目标列,那么继续将markRange划分,range范围包括step个mark,并将这些新range放入栈中。依次类推。示意图如下

(4)处代码表示,最后筛选后的结果range都是一个mark,这个时候要判断,该目标mark与上一个符合要求的range之间的gap,如果gap小于参数min_marks_for_seek则,则将这个mark与上一个range合成一个range。示意图如下。

1
2
3
4
5
6
7
8
9
10
11
12
13
14
15
16
17
18
19
20
21
22
23
24
25
26
27
28
29
30
31
32
33
34
35
36
37
38
39
40
41
42
43
44
45
46
47
48
49
50
51
52
53
54
55
56
57
58
59
60
61
62
63
64
65
66
67
68
69
70
71
72
73
74
75
76
77
MarkRanges MergeTreeDataSelectExecutor::markRangesFromPKRange(
const MergeTreeData::DataPartPtr & part,
const StorageMetadataPtr & metadata_snapshot,
const KeyCondition & key_condition,
const Settings & settings,
Poco::Logger * log)
{
MarkRanges res;
....
auto may_be_true_in_range = [&](MarkRange & range) //(1)
{
if (range.end == marks_count && !has_final_mark)
{
for (size_t i = 0; i < used_key_size; ++i)
{
create_field_ref(range.begin, i, index_left[i]);
index_right[i] = POSITIVE_INFINITY;
}
}
else
{
if (has_final_mark && range.end == marks_count)
range.end -= 1; /// Remove final empty mark. It's useful only for primary key condition.

for (size_t i = 0; i < used_key_size; ++i)
{
create_field_ref(range.begin, i, index_left[i]);
create_field_ref(range.end, i, index_right[i]);
}
}
return key_condition.mayBeTrueInRange(
used_key_size, index_left.data(), index_right.data(), primary_key.data_types);
};

if (!key_condition.matchesExactContinuousRange())
{

std::vector<MarkRange> ranges_stack = { {0, marks_count} };
size_t steps = 0;

while (!ranges_stack.empty()) //(2)
{
MarkRange range = ranges_stack.back();
ranges_stack.pop_back();

if (!may_be_true_in_range(range)) //(3)
continue;

if (range.end == range.begin + 1)
{
/// We saw a useful gap between neighboring marks. Either add it to the last range, or start a new range.
if (res.empty() || range.begin - res.back().end > min_marks_for_seek) //(4)
res.push_back(range);
else
res.back().end = range.end;
}
else
{
/// Break the segment and put the result on the stack from right to left.
size_t step = (range.end - range.begin - 1) / settings.merge_tree_coarse_index_granularity + 1;
size_t end;

for (end = range.end; end > range.begin + step; end -= step)
ranges_stack.emplace_back(end - step, end);

ranges_stack.emplace_back(range.begin, end);
}
}

}
else
{
...
}

return res;
}

划分ThreadTask

spreadMarkRangesAmongStreams函数中主要通过构建多个MergeTreeThreadSelectProcessor并与同一个MergeTreeReadPool相关联。而MergeTreeReadPool的构造函数中会调用fillPerPartInfo和fillPerThreadInfo方法。fillPerPartInfo方法主要是统计了每个待读取的DataPart的相关信息,比如每个DataPart含有的总mark数。而fillPerThreadInfo方法中则是首先将所有的DataPart按照所在的disk名字进行排序,然后将这些的DataPart,进一步分成小的markranges。Mark作为ClickHouse中读取数据的最小单位,markrange记录了Datapart
中mark的范围[begin,end).

1
2
3
4
5
6
7
8
9
10
11
12
13
14
15
16
17
18
19
20
21
22
23
24
25
26
27
28
29
30
31
32
33
34
35
36
37
38
39
40
41
42
43
44
45
46
47
48
49
50
51
52
53
54
55
56
57
58
59
60
61
62
63
64
65
66
67
68
69
70
71
72
73
74
75
76
77
78
79
80
81
82
83
84
85
86
87
88
89
90
91
92
93
94
95
96
97
98
99
100
101
void MergeTreeReadPool::fillPerThreadInfo(
size_t threads, size_t sum_marks, std::vector<size_t> per_part_sum_marks,
const RangesInDataParts & parts, size_t min_marks_for_concurrent_read)
{
threads_tasks.resize(threads); //thread_taks类似于一个二维数组,存放每个线程tasks
...

using PartsInfo = std::vector<PartInfo>;
std::queue<PartsInfo> parts_queue;

{
// 根据DataPart所在Disk的名字排序
std::map<String, std::vector<PartInfo>> parts_per_disk;

for (size_t i = 0; i < parts.size(); ++i)
{
PartInfo part_info{parts[i], per_part_sum_marks[i], i};
if (parts[i].data_part->isStoredOnDisk())
parts_per_disk[parts[i].data_part->volume->getDisk()->getName()].push_back(std::move(part_info));
else
parts_per_disk[""].push_back(std::move(part_info));
}

for (auto & info : parts_per_disk)
parts_queue.push(std::move(info.second));
}

const size_t min_marks_per_thread = (sum_marks - 1) / threads + 1;

// 遍历每一个线程,为每一个线程分配任务
for (size_t i = 0; i < threads && !parts_queue.empty(); ++i)
{
auto need_marks = min_marks_per_thread;

while (need_marks > 0 && !parts_queue.empty())
{
auto & current_parts = parts_queue.front();
RangesInDataPart & part = current_parts.back().part;
size_t & marks_in_part = current_parts.back().sum_marks;
const auto part_idx = current_parts.back().part_idx;

/// Do not get too few rows from part.
if (marks_in_part >= min_marks_for_concurrent_read &&
need_marks < min_marks_for_concurrent_read)
need_marks = min_marks_for_concurrent_read;

/// Do not leave too few rows in part for next time.
if (marks_in_part > need_marks &&
marks_in_part - need_marks < min_marks_for_concurrent_read)
need_marks = marks_in_part;

MarkRanges ranges_to_get_from_part;
size_t marks_in_ranges = need_marks;gett

/// Get whole part to read if it is small enough.
if (marks_in_part <= need_marks)
{
ranges_to_get_from_part = part.ranges;
marks_in_ranges = marks_in_part;

need_marks -= marks_in_part;
current_parts.pop_back();
if (current_parts.empty())
parts_queue.pop();
}
else
{
/// Loop through part ranges.
while (need_marks > 0)
{
if (part.ranges.empty())
throw Exception("Unexpected end of ranges while spreading marks among threads", ErrorCodes::LOGICAL_ERROR);

MarkRange & range = part.ranges.front();

const size_t marks_in_range = range.end - range.begin;
const size_t marks_to_get_from_range = std::min(marks_in_range, need_marks);

ranges_to_get_from_part.emplace_back(range.begin, range.begin + marks_to_get_from_range);
range.begin += marks_to_get_from_range;
marks_in_part -= marks_to_get_from_range;
need_marks -= marks_to_get_from_range;
if (range.begin == range.end)
part.ranges.pop_front();
}
}
//
threads_tasks[i].parts_and_ranges.push_back({ part_idx, ranges_to_get_from_part });
threads_tasks[i].sum_marks_in_parts.push_back(marks_in_ranges);
if (marks_in_ranges != 0)
remaining_thread_tasks.insert(i);
}

//切换到分配下一个线程任务之前,切换disk。这样尽可能的是不同的磁盘负载到不同的线程中去,依次来最大化磁盘并行度。
if (parts_queue.size() > 1)
{
parts_queue.push(std::move(parts_queue.front()));
parts_queue.pop();
}
}
}

PIPELINE执行

在pipeline执行的时候,MergeTreeThreadSelectProcessor的work方法会调用到getTask方法向MergeTreeReadPool中请求Task

1
2
3
4
5
6
7
8
9
10
11
12
13
14
15
16
17
18
19
20
21
22
23
24
25
26
27
28
29
30
31
32
33
34
35
36
37
38
39
40
41
42
43
44
45
46
47
48
49
50
51
52
53
54
55
56
57
58
59
60
MergeTreeReadTaskPtr MergeTreeReadPool::getTask(size_t min_marks_to_read, size_t thread, const Names & ordered_names)
{
...
auto thread_idx = thread;
if (!tasks_remaining_for_this_thread)
{
... //如果本线程的task做完,则尝试窃取其他线程的任务
}

...
/// Do not leave too little rows in part for next time.
// 如果此次获取到的range后,剩下的mark比较少,那么就一次行读整个DataPart,提高效率。
if (marks_in_part > need_marks &&
marks_in_part - need_marks < min_marks_to_read)
need_marks = marks_in_part;

MarkRanges ranges_to_get_from_part;

/// Get whole part to read if it is small enough.
//DataPart本身含有的mark总数就比较少,也一次性的读取整个DataPart
if (marks_in_part <= need_marks)
{
const auto marks_to_get_from_range = marks_in_part;
ranges_to_get_from_part = thread_task.ranges;

marks_in_part -= marks_to_get_from_range;

thread_tasks.parts_and_ranges.pop_back();
thread_tasks.sum_marks_in_parts.pop_back();

if (thread_tasks.sum_marks_in_parts.empty())
remaining_thread_tasks.erase(thread_idx);
}
else
{

/// Loop through part ranges.
// 遍历这个DataPart的range,找到足够数量的mark然后返回。
while (need_marks > 0 && !thread_task.ranges.empty())
{
auto & range = thread_task.ranges.front();

const size_t marks_in_range = range.end - range.begin;
const size_t marks_to_get_from_range = std::min(marks_in_range, need_marks);

ranges_to_get_from_part.emplace_back(range.begin, range.begin + marks_to_get_from_range);
range.begin += marks_to_get_from_range;
if (range.begin == range.end)
thread_task.ranges.pop_front();

marks_in_part -= marks_to_get_from_range;
need_marks -= marks_to_get_from_range;
}
}

return std::make_unique<MergeTreeReadTask>(
part.data_part, ranges_to_get_from_part, part.part_index_in_query, ordered_names,
per_part_column_name_set[part_idx], per_part_columns[part_idx], per_part_pre_columns[part_idx],
prewhere_info && prewhere_info->remove_prewhere_column, per_part_should_reorder[part_idx], std::move(curr_task_size_predictor));
}

MergeTreeThreadSelectProcessor的work在执行完getTask方法后,会根据返回的结果去读取数据。
代码调用如下。

因为clickHouse有谓词下推的优化,MergeTreeRangeReader::read读取的逻辑上是首先根据PreWhere信息(如果有的话)去读取prewhere列(1)处,然后读取其他需要的列(2)处,最后根据preWhere信息去除掉不满足要求的列(5)处。而其中真正读取数据时(1,2,4)处,会根据DataPart类型对应于MergeTreeReaderCompact、MergeTreeReaderWide以及mergeTreeReaderInMemory三种Reader来最终将数据读到内存。除了mergeTreeReaderInMemory,其他两个读取数据主要涉及编解码,比较底层,有兴趣的同学可以阅读源码MergeTreeReaderWide/Compact/InMemroy::readRows。

1
2
3
4
5
6
7
8
9
10
11
12
13
14
15
16
17
18
19
20
21
22
23
24
MergeTreeRangeReader::ReadResult MergeTreeRangeReader::read(size_t max_rows, MarkRanges & ranges)
{
...
if (prev_reader)
{
read_result = prev_reader->read(max_rows, ranges); //(1)
...
Columns columns = continueReadingChain(read_result, num_read_rows); //(2)
...

for (auto & column : columns) //(3)
read_result.columns.emplace_back(std::move(column));
}
else
{
...
read_result = startReadingChain(max_rows, ranges); //(4)
...
}

...
executePrewhereActionsAndFilterColumns(read_result); //(5)
return read_result;
}

QueryPlane->PIPELINE

使用官方教程的例子, 构建相应的表并导入数据集tutorial.hits_v1和tutorial.visits_v1。执行查询示例。

1
2
3
4
5
6
7
8
SELECT
StartURL AS URL,
AVG(Duration) AS AvgDuration
FROM tutorial.visits_v1
WHERE StartDate BETWEEN '2014-03-23' AND '2014-03-30'
GROUP BY URL
ORDER BY AvgDuration DESC
LIMIT 10

使用explain查询sql的queryPlane以及使用EXPLAIN PIPELINE查询pipeline情况。

QueryPlan结果如下

1
2
3
4
5
6
7
8
9
10
┌─explain─────────────────────────────────────────────────────────────────────────────┐
│ Expression (Projection) │
│ Limit (preliminary LIMIT (without OFFSET)) │
│ Sorting (Sorting for ORDER BY) │
│ Expression (Before ORDER BY) │
│ Aggregating │
│ Expression (Before GROUP BY) │
│ SettingQuotaAndLimits (Set limits and quota after reading from storage) │
│ ReadFromMergeTree (tutorial.visits_v1) │
└─────────────────────────────────────────────────────────────────────────────────────┘

QueryPlan是一个树形结构,对应到代码中表示为如下,箭头表示A->B表示A是B的父节点。xxxStep表示的是类名字

1
ExpressionStep->LimitStep->SortingSetp->ExpressionStep->AggregatingStep->ExpressionStep->SettingQuotaAndLimitsStep->ReadFromMergeTreeStep

PIPELINE结果如下

1
2
3
4
5
6
7
8
9
10
11
12
13
14
15
16
17
18
19
20
21
22
┌─explain─────────────────────────────────────────┐
│ (Expression) │
│ ExpressionTransform │
│ (Limit) │
│ Limit │
│ (Sorting) │
│ MergeSortingTransform │
│ LimitsCheckingTransform │
│ PartialSortingTransform │
│ (Expression) │
│ ExpressionTransform │
│ (Aggregating) │
│ Resize 6 → 1 │
│ AggregatingTransform × 6 │
│ StrictResize 6 → 6 │
│ (Expression) │
│ ExpressionTransform × 6 │
│ (SettingQuotaAndLimits) │
│ (ReadFromMergeTree) │
│ MergeTreeThread × 6 0 → 1 │
└─────────────────────────────────────────────────┘

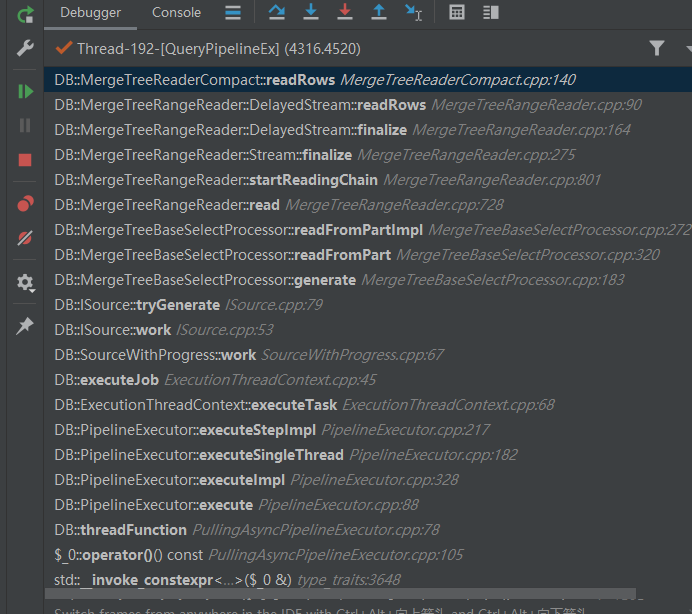
上述结果的 x 表示有几个这个类型的processor,比如有6个MergeTreeThread来拉取数据,而
x->y中,x表示有几个inPort,y表示有几个outPort。其中括号内的内容表示对应的queryPlanStep。笔者对ClickHouse中这一查询进行debug,其中具体pipeline表达如下图。相同颜色的表示同一类型的processor。

构建pipeline的代码调用栈如下图。

buildQueryPipeline方法本质上对queryPlan树形数据结构进行后序遍历,不过这里没有使用递归实现,而是使用栈。考虑原因一个是如果流水线太深,则会有太多的调用栈,可能会出现栈溢出问题。其次,栈实现效率上面本身也因为少了函数调用的开销而更有效率。主要过程为首先将queryplan的root节点入栈(1)处。其中比较巧妙的地方在于(3)处,通过判断当前栈顶元素pipelines中有几个已经构建好的pipeline,如果当前节点的每个孩子节点都已经处理完毕了,也就是说每个孩子节点对应的子树都已经转换为了一个pipeline,那么通过当前节点的updatePipeline方法来将当前节点加入并将孩子节点的pipleline连接起来(4)处。举一个简单的例子,如下图所示。这个queryplan有四个节点,首先后续遍历会处理node2节点,进入(3)代码处,因为他的孩子节点数目为零等于pipelines的元素个数也为零。因此,(3)中会将node2节点中生成的pipeline赋值给lastpipeline,然后将node2从栈中弹出。那么有后续遍历的规则,退出当前栈顶节点为node1,(2)处lastpipeline不为空,将lastpipeline放入之node1的pipelines中。当代码运行到(3)时,nextchild为1,而孩子个数为2,因此将node3入栈,当下一次循环时候,node3因为没有孩子节点会跟node2节点一样进入(3),从而生成pipeline并赋值给lastpipeline并弹出node3.因此node1再次成为栈顶节点,且这次piplelines中有了2个流水线,分别为node2节点和node3节点生成的,成功进入到(3),得以执行updatePipeline方法将本节点加入到pipleline,并将生成的新pipeline传给root节点,依次类推,root节点最终返回生成的最后的lastpipeline。

1
2
3
4
5
6
7
8
9
10
11
12
13
14
15
16
17
18
19
20
21
22
23
24
25
26
27
28
29
30
31
32
33
34
35
36
37
38
39
40
41
42
43
44
QueryPipelineBuilderPtr QueryPlan::buildQueryPipeline(
const QueryPlanOptimizationSettings & optimization_settings,
const BuildQueryPipelineSettings & build_pipeline_settings)
{
...
struct Frame
{
Node * node = {};
QueryPipelineBuilders pipelines = {};
};

QueryPipelineBuilderPtr last_pipeline;

std::stack<Frame> stack;
stack.push(Frame{.node = root}); //(1)

while (!stack.empty())
{
auto & frame = stack.top();

if (last_pipeline) //(2)
{
frame.pipelines.emplace_back(std::move(last_pipeline));
last_pipeline = nullptr; //-V1048
}

size_t next_child = frame.pipelines.size();
if (next_child == frame.node->children.size()) //(3)
{
bool limit_max_threads = frame.pipelines.empty();
last_pipeline = frame.node->step->updatePipeline(std::move(frame.pipelines), //(4) build_pipeline_settings);

if (limit_max_threads && max_threads)
last_pipeline->limitMaxThreads(max_threads);

stack.pop();
}
else
stack.push(Frame{.node = frame.node->children[next_child]});
}

...
return last_pipeline;
}

核心概念和数据结构

ClickHouse中Pipeline的表示,是用Port将不同的processor连接起来。processor接口中
核心两个方法prepare和work方法。prepare可以简单理解为拉取数据。如果经过prepare方法数据准备好后,再通过执行work方法来处理数据,可能需要把处理完的数据推送到它的outPort并更新outPort状态。还有个比较重要的事情,即两个相连接的端口是共享状态的。即如果processor在work方法执行完毕后,改变了它的outport状态,那么processorB的inport端口状态也改变了。因此通过这种端口共享状态的方式实现了processor之间的状态变化感知。

1
prcessorA ->outport->inport->procesorB
1
2
3
4
5
6
7
8
9
10
11
12
13
14
15
16
17
18
19
20
21
22
23
24
25
26
27
28
29
30
31
32
33
34
35
36
37
38
39
40
41
42
43
44
45
46
47
class IProcessor
{
protected:
InputPorts inputs;
OutputPorts outputs;
public:
virtual Status prepare()
{
throw Exception("Method 'prepare' is not implemented for " + getName() + " processor", ErrorCodes::NOT_IMPLEMENTED);
}

/** Method 'prepare' is responsible for all cheap ("instantaneous": O(1) of data volume, no wait) calculations.
*
* It may access input and output ports,
* indicate the need for work by another processor by returning NeedData or PortFull,
* or indicate the absence of work by returning Finished or Unneeded,
* it may pull data from input ports and push data to output ports.
*
* The method is not thread-safe and must be called from a single thread in one moment of time,
* even for different connected processors.
*
* Instead of all long work (CPU calculations or waiting) it should just prepare all required data and return Ready or Async.
*
* Thread safety and parallel execution:
* - no methods (prepare, work, schedule) of single object can be executed in parallel;
* - method 'work' can be executed in parallel for different objects, even for connected processors;
* - method 'prepare' cannot be executed in parallel even for different objects,
* if they are connected (including indirectly) to each other by their ports;
*/
virtual Status prepare()
{
throw Exception("Method 'prepare' is not implemented for " + getName() + " processor", ErrorCodes::NOT_IMPLEMENTED);
}

/// Optimization for prepare in case we know ports were updated.
virtual Status prepare(const PortNumbers & /*updated_input_ports*/, const PortNumbers & /*updated_output_ports*/) { return prepare(); }

/** You may call this method if 'prepare' returned Ready.
* This method cannot access any ports. It should use only data that was prepared by 'prepare' method.
*
* Method work can be executed in parallel for different processors.
*/
virtual void work()
{
throw Exception("Method 'work' is not implemented for " + getName() + " processor", ErrorCodes::NOT_IMPLEMENTED);
}
}

ClickHouse在执行Pipeline之前会把Pipeline转化为ExecutingGraph,简单理解就是把pipeline中每个processor转化为node。pipeline中DAG图的每条连接在转化为ExecutingGraph后都会有两条边,分别为direct_edge 和 backward_edge。通过edge来关联每个node。其中的node中的direct_edges和back_edges容易让人迷惑。举个简单的例子,如下图,红色虚线表示原始的pipeline,数据流向表示的是数据从数据源中读出,经过各个tranform处理的数据流向。从图中可以看出原始的pipeline中的一个连接对应着两条边,比方说NodeA和NodeB的连接,那么边1是NodeA的direct_edge,边4是NodeB的backward_edge。每个edge结构体中有个to字段,表示的是与这条边相关联的Node。对于direct_edge来说,这个边对应的是节点的outPort,而backward_edge对应的是节点的inport。还需要注意的是edge中的input_port_number和output_port_number指的是这条边相关联的一个inport和一个outPort的序号。因此对应于原pipeline中一个连接的两条边,他们的inport_numer和output_port_number是一样的。

1
2
3
4
5
6
7
8
9
10
11
12
13
14
15
16
17
18
19
20
21
22
23
24
25
26
27
28
29
30
31
32
33
34
35
36
37
38
39
40
41
42
43
44
45
46
/// Edge represents connection between OutputPort and InputPort.
/// For every connection, two edges are created: direct and backward (it is specified by backward flag).
struct Edge
{
{
update_info.update_list = update_list;
update_info.id = this;
}

/// Processor id this edge points to.
/// It is processor with output_port for direct edge or processor with input_port for backward.
bool backward;
/// Port numbers. They are same for direct and backward edges.
uint64_t input_port_number;
uint64_t output_port_number;

/// Edge version is increased when port's state is changed (e.g. when data is pushed). See Port.h for details.
/// To compare version with prev_version we can decide if neighbour processor need to be prepared.
Port::UpdateInfo update_info;
};


struct Node
{
/// Processor and it's position in graph.
IProcessor * processor = nullptr;
uint64_t processors_id = 0;

/// Direct edges are for output ports, back edges are for input ports.
Edges direct_edges;
Edges back_edges;

/// Ports which have changed their state since last processor->prepare() call.
/// They changed when neighbour processors interact with connected ports.
/// They will be used as arguments for next processor->prepare() (and will be cleaned after that).
IProcessor::PortNumbers updated_input_ports;
IProcessor::PortNumbers updated_output_ports;

/// Ports that have changed their state during last processor->prepare() call.
/// We use this data to fill updated_input_ports and updated_output_ports for neighbour nodes.
/// This containers are temporary, and used only after processor->prepare() is called.
/// They could have been local variables, but we need persistent storage for Port::UpdateInfo.
Port::UpdateInfo::UpdateList post_updated_input_ports;
Port::UpdateInfo::UpdateList post_updated_output_ports;

};

PIPELINE的执行过程

我们按照执行过程中的函数调用来讲解执行的细节。
以SELECT语句为例,
首先在TCPHandker.cpp中调用TCPHandler::processOrdinaryQueryWithProcessors方法。
(1)处构建了一个PullingAsyncPipelineExecutor对象executor,然后不断执行executor的pull方法,结果通过block返回。pull返回一个布尔值,返回false表示query结束。

1
2
3
4
5
6
7
8
9
10
11
12
13
14
15
16
17
18
19
20
void TCPHandler::processOrdinaryQueryWithProcessors()
{
auto & pipeline = state.io.pipeline;
...
{
PullingAsyncPipelineExecutor executor(pipeline); //(1)
...
Block block;
while (executor.pull(block, interactive_delay / 1000)) //(2)
{
...
if (block)
{
if (!state.io.null_format)
sendData(block);
}
}
...
sendProgress();
}

pull方法主要完成的任务是构造一个函数func(1)处,然后将这个函数提交到线程池中(3)处(关于如何提交job的细节可以看上一篇文章)。因此最终一定会在某个线程中执行threadfuntion函数。

1
2
3
4
5
6
7
8
9
10
11
12
13
14
15
16
17
18
19
bool PullingAsyncPipelineExecutor::pull(Chunk & chunk, uint64_t milliseconds)
{
if (!data)
{
data = std::make_unique<Data>();
data->executor = std::make_shared<PipelineExecutor>(pipeline.processors, pipeline.process_list_element);
data->lazy_format = lazy_format.get();

auto func = [&, thread_group = CurrentThread::getGroup()]() //(1)
{
threadFunction(*data, thread_group, pipeline.getNumThreads());//(2)
};

data->thread = ThreadFromGlobalPool(std::move(func)); //(3)
}

...
return true;
}

threadfunction是一个静态方法,方法中会调用data.executor->execute(num_threads);
execute方法中会调用executeImpl方法(num_threads)方法,下面详细看executeImpl方法。
首先(2)处创建了一个Vector,其容器类型为ThreadFromGloablPool,其功能类似于std::thread,
只不过添加了一些额外的一些线程状态信息。然后在for循环中(3)处,通过thread.emplace_back,在向vector中添加对象的同时,也会向线程池中提交job,因为ClickHouse中在类ThreadFromGlobal的构造函数中就向线程池提交任务。而任务就是(3)处中emplace_back的参数lamda表达式。整个executeImple函数的核心逻辑为根据参数num_threads,来创建同样数量的job并提交到线程之中去,也意味着此PIPELINE由num_theads个线程来执行。可以看到,每个线程中的核心方法为executeSingleThread(thread_num)(4)处。

(1)处的initializeExecution(num_threads)方法其实是实现ClickHouse,pull 流水线的逻辑。数据库中常用的模型还有比如火山模型等等(TODO总结常见的流水线模型)。

1
2
3
4
5
6
7
8
9
10
11
12
13
14
15
16
17
18
19
20
21
22
23
24
25
26
27
28
29
30
31
32
33
34
35
36
37
38
39
40
41
42
43
void PipelineExecutor::executeImpl(size_t num_threads)
{
...
initializeExecution(num_threads); //(1)

using ThreadsData = std::vector<ThreadFromGlobalPool>; //(2)
ThreadsData threads;
threads.reserve(num_threads);

bool finished_flag = false;
...

if (num_threads > 1)
{
auto thread_group = CurrentThread::getGroup();

for (size_t i = 0; i < num_threads; ++i)
{
//(3)empalce_back函数接受的参数是lambda表达式会被转化为job。
threads.emplace_back([this, thread_group, thread_num = i]
{
/// ThreadStatus thread_status;

setThreadName("QueryPipelineEx");

if (thread_group)
CurrentThread::attachTo(thread_group);

try
{
executeSingleThread(thread_num); //(4)
}
catch (...)
{
/// In case of exception from executor itself, stop other threads.
finish();
tasks.getThreadContext(thread_num).setException(std::current_exception());
}
});
}

...
}

开篇讲过pipeline的构造函数中会将pipeline的processor转化成DAG图,对应ClickHouse中类为ExecutingGraph。initializeExecution函数会调用ExecutingGraph的initializeExecution函数。initializeExecution函数中首先在DAG图中找到没有direct_edge(出边)的节点作为启动节点并加入栈中,然后从这个节点执行updateNode。UpdateNode函数通过执行当前节点的
prepare方法去拉取数据,然后更新与当前节点相关联的edge(这里有个trick,prepare方法更新的是processor的端口状态,那么如何通过端口来找到与之关联的edge呢,其实端口对象中有一个结构体updateInfo,其中有一个字段id表示了其edge的地址(指针)详细参考[1])然后通过edge找到下一个node,执行下一个node的prepare方法,从而依次类推,最终将所有状态为Ready的node将入到队列中,加入到队列的node会被线程池中的线程去执行其node中的procesor中的work方法。

1
2
3
4
5
6
7
8
9
10
11
12
13
14
15
16
17
18
19
20
21
22
23
24
void ExecutingGraph::initializeExecution(Queue & queue)
{
std::stack<uint64_t> stack;

/// Add childless processors to stack.
uint64_t num_processors = nodes.size();
for (uint64_t proc = 0; proc < num_processors; ++proc)
{
if (nodes[proc]->direct_edges.empty())
{
stack.push(proc);
/// do not lock mutex, as this function is executed in single thread
nodes[proc]->status = ExecutingGraph::ExecStatus::Preparing;
}
}
...
while (!stack.empty())
{
uint64_t proc = stack.top();
stack.pop();
updateNode(proc, queue, async_queue);
...
}
}
1
2
3
4
5
6
7
8
9
10
11
12
13
14
15
16
17
18
19
20
21
22
23
24
25
26
27
28
29
30
31
32
33
34
35
36
37
38
39
40
41
42
43
44
45
46
47
48
49
50
51
52
53
54
55
56
57
58
59
60
61
62
63
64
65
66
67
68
69
70
71
72
73
74
75
76
77
78
79
80
81
82
83
84
85
86
87
88
89
90
91
92
93
94
95
96
97
98
99
100
101
102
103
104
105
106
107
108
109
110
111
112
113
114
115
116
117
118
bool ExecutingGraph::updateNode(uint64_t pid, Queue & queue, Queue & async_queue)
{
std::stack<Edge *> updated_edges; //需要更新的edge
std::stack<uint64_t> updated_processors; //需要更新端口状态的processon
updated_processors.push(pid);

UpgradableMutex::ReadGuard read_lock(nodes_mutex);

while (!updated_processors.empty() || !updated_edges.empty())
{
std::optional<std::unique_lock<std::mutex>> stack_top_lock;

if (updated_processors.empty())
{
auto * edge = updated_edges.top();
updated_edges.pop();

/// Here we have ownership on edge, but node can be concurrently accessed.

auto & node = *nodes[edge->to]; //通过edge找到与这条边相关联的node
...

if (!updated_processors.empty())
{
pid = updated_processors.top();
updated_processors.pop();

/// In this method we have ownership on node.
auto & node = *nodes[pid];

bool need_expand_pipeline = false;
{
std::unique_lock<std::mutex> lock(std::move(*stack_top_lock));

try
{
auto & processor = *node.processor;
IProcessor::Status last_status = node.last_processor_status;
//通过执行当前node中的prepare方法来拉取数据并更新与之相关的端口状态。
IProcessor::Status status = processor.prepare(node.updated_input_ports, node.updated_output_ports);
node.last_processor_status = status;

if (profile_processors)
{
...
}
}
catch (...)
{
...
}
node.updated_input_ports.clear();
node.updated_output_ports.clear();

switch (node.last_processor_status)
{
case IProcessor::Status::NeedData:
case IProcessor::Status::PortFull:
{
node.status = ExecutingGraph::ExecStatus::Idle;
break;
}
case IProcessor::Status::Finished:
{
node.status = ExecutingGraph::ExecStatus::Finished;
break;
}
case IProcessor::Status::Ready:
{
node.status = ExecutingGraph::ExecStatus::Executing;
queue.push(&node);// node状态为ready表示该节点对应的processor,中的数据准备好了,可以进行处理,
//放入queue里。当方法返回后,线程池中的线程会从这个队列里取出这个node然后执行其work方法。
break;
}
case IProcessor::Status::Async:
{
node.status = ExecutingGraph::ExecStatus::Executing;
async_queue.push(&node);
break;
}
case IProcessor::Status::ExpandPipeline:
{
need_expand_pipeline = true;
break;
}
}

if (!need_expand_pipeline)
{

for (auto it = node.post_updated_output_ports.rbegin(); it != node.post_updated_output_ports.rend(); ++it)
{
auto * edge = static_cast<ExecutingGraph::Edge *>(*it);
updated_edges.push(edge);
edge->update_info.trigger();
}

for (auto it = node.post_updated_input_ports.rbegin(); it != node.post_updated_input_ports.rend(); ++it)
{
auto * edge = static_cast<ExecutingGraph::Edge *>(*it);
updated_edges.push(edge);
edge->update_info.trigger();
}

node.post_updated_input_ports.clear();
node.post_updated_output_ports.clear();
}
}

if (need_expand_pipeline)
{
...
}
}
}

return true;
}

executeSingleThread方法中会调用executeStepImpl函数,(1)处context的类型为ExecutionThreadContext。(2)处的tryGetTask方法,其实就是pipeineExecutor中通过成员变量ExecutorTasks维护了一个vector<vector>这样一个二维任务队列(前面讲到的updateNode方法中将状态为Ready的Node放到队列中去,最终会将这个队列中的task按照Round Robin方式放到这个二维任务队列中去)。每个线程根据线程id来读取他自己的任务队列。tryGetTask方法就是将node从任务队列取出,然后通过threadContext来将当前正在处理的节点设置为node,那么context.hasTask方法通过当前node是否为空来判断是否有任务,有则执行(3),context.executeTaskh会调用executeJob。当work方法执行完毕后,如果有下游节点的话,那么通常数据会被推送到输出端口,这个时候通常情况下它的下游node因为输入端口有了数据,执行prepare方法很大可能状态会变为Ready。因此会当前node执行完work后会再执行updateNode方法来尝试执行下游节点。

1
2
3
4
5
6
7
8
9
10
11
12
13
14
15
16
17
18
19
20
21
22
23
24
25
26
27
28
29
30
31
32
33
34
35
36
37
38
39
40
41
42
43
44
45
46
void PipelineExecutor::executeStepImpl(size_t thread_num, std::atomic_bool * yield_flag)
{

auto & context = tasks.getThreadContext(thread_num); //(1)
bool yield = false;

while (!tasks.isFinished() && !yield)
{
/// First, find any processor to execute.
/// Just traverse graph and prepare any processor.
while (!tasks.isFinished() && !context.hasTask())
tasks.tryGetTask(context); //(2)

while (context.hasTask() && !yield)
{
if (tasks.isFinished())
break;

if (!context.executeTask()) //(3)
cancel();

if (tasks.isFinished())
break;

if (!checkTimeLimitSoft())
break;

#ifndef NDEBUG
Stopwatch processing_time_watch;
#endif

/// Try to execute neighbour processor.
{
Queue queue;
Queue async_queue;

/// Prepare processor after execution. //(4)
if (!graph->updateNode(context.getProcessorID(), queue, async_queue))
finish();

/// Push other tasks to global queue.
tasks.pushTasks(queue, async_queue, context);
}


}

executeJob是一个静态方法,会最终执行pipeline中的processor的work方法,完成数据的处理。

1
2
3
4
5
6
7
8
9
10
11
12
13
static void executeJob(IProcessor * processor)
{
try
{
processor->work();
}
catch (Exception & exception)
{
if (checkCanAddAdditionalInfoToException(exception))
exception.addMessage("While executing " + processor->getName());
throw;
}
}

最后用一张图来总结全文

参考文献

[1]https://www.cnblogs.com/wyc2021/p/15648668.html

线程池的一般原理

线程池(Thread Pool),简单理解就是系统一方面为了减少创建销毁线程的开销,另一方面避免
系统中线程数量膨胀导致的调度开销,而维护的一系列线程集合。其工作原理非常简单,线程池中维护一系列的worker线程和一个任务队列,这些worker线程不断的从任务队列里来取出任务并执行。客户端只需要通过接口向线程池中提交任务即可,线程池负责这些任务的调度与执行。接下来主要从ClickHouse中线程池的类关系,启动过程,worker工作线程,job提交几方面来讲述。

线程池的类关系

ClickHouse中的线程池实现定义在ThreadPool.文件中。类似于boost::threadpool。
几个主要类关系为下

1
2
3
/// ThreadPool with std::thread for threads.
using FreeThreadPool = ThreadPoolImpl<std::thread>;
class GlobalThreadPool : public FreeThreadPool, private boost::noncopyable

线程池中的任务定义为JobWithPriority,实现为ThreadPoolImpl内部的一个结构体。

1
2
3
4
5
6
7
8
9
10
11
12
13
14
using Job = std::function<void()>;
struct JobWithPriority
{
Job job;
int priority;

JobWithPriority(Job job_, int priority_)
: job(job_), priority(priority_) {}

bool operator< (const JobWithPriority & rhs) const
{
return priority < rhs.priority;
}
};

线程池的启动

ThreadPoolImpl中有个成员变量std::list threads来维护线程,
以及一个任务队列boost::heap::priority_queue jobs;
调度方法实现在scheduleImpl中,如下,省略部分无关代码。首先判断线程队列中已有的线程数量
是否超过线程池设置的参数最大线程数量,如果没有超过,那么新启动一个新worker线程,并将job存到任务队列里。否则不会启动新的worker线程,只是将job放到任务队列。启动过程类似于Java线程池实现(ThreadPoolExecutor)[1]。

1
2
3
4
5
6
7
8
9
10
11
12
13
14
15
16
17
18
19
20
21
22
23
24
25
26
27
28
29
30
31
32
33
34
35
ReturnType ThreadPoolImpl<Thread>::scheduleImpl(Job job, int priority, std::optional<uint64_t> wait_microseconds)
{
....
/// Check if there are enough threads to process job.
if (threads.size() < std::min(max_threads, scheduled_jobs + 1))
{
try
{
threads.emplace_front();
}
catch (...)
{
/// Most likely this is a std::bad_alloc exception
return on_error("cannot allocate thread slot");
}

try
{
//这一行代码创建线程了新的worker线程。Thread是模板类型std:thread
threads.front() = Thread([this, it = threads.begin()] { worker(it); });
}
catch (...)
{
threads.pop_front();
return on_error("cannot allocate thread");
}
}

jobs.emplace(std::move(job), priority); //task入队列
++scheduled_jobs;
new_job_or_shutdown.notify_one();
}

return ReturnType(true);
}

worker线程

每个worker线程,如下,省略部分非核心代码,以及异常判断。核心思想就是从tasks队列里按序
取出jobWithPriority对象,然后转换成job对象,可以理解为一个函数,然后执行这个函数,不段的重复这个过程。

1
2
3
4
5
6
7
8
9
10
11
12
13
14
15
16
17
18
19
20
21
22
23
24
25
26
27
28
29
30
31
32
33
34
35
36
37
38
39
40
41
42
43
44
45
46
47
48
49
50
51
52
53
54
55
56
57
58
59
60
61
62
63
64
65
66
67
68
69
70
71
72
73
74
75
76
77
void ThreadPoolImpl<Thread>::worker(typename std::list<Thread>::iterator thread_it)
{
while (true)
{
/// This is inside the loop to also reset previous thread names set inside the jobs.
setThreadName("ThreadPool");

Job job;
bool need_shutdown = false;

{
std::unique_lock lock(mutex);
new_job_or_shutdown.wait(lock, [this] { return shutdown || !jobs.empty(); });
need_shutdown = shutdown;

if (!jobs.empty())
{
/// boost::priority_queue does not provide interface for getting non-const reference to an element
/// to prevent us from modifying its priority. We have to use const_cast to force move semantics on JobWithPriority::job.
job = std::move(const_cast<Job &>(jobs.top().job));
jobs.pop();
}
else
{
/// shutdown is true, simply finish the thread.
return;
}

}

if (!need_shutdown)
{
try
{
...
job(); // 执行真正的任务
/// job should be reset before decrementing scheduled_jobs to
/// ensure that the Job destroyed before wait() returns.
job = {};
}
catch (...)
{
/// job should be reset before decrementing scheduled_jobs to
/// ensure that the Job destroyed before wait() returns.
job = {};

{
std::unique_lock lock(mutex);
if (!first_exception)
first_exception = std::current_exception(); // NOLINT
if (shutdown_on_exception)
shutdown = true;
--scheduled_jobs;
}

job_finished.notify_all();
new_job_or_shutdown.notify_all();
return;
}
}

{
std::unique_lock lock(mutex);
--scheduled_jobs;

if (threads.size() > scheduled_jobs + max_free_threads)
{
thread_it->detach();
threads.erase(thread_it);
job_finished.notify_all();
return;
}
}

job_finished.notify_all();
}
}

job的提交

ClickHouse的线程实现为类ThreadFromGlobalPool,使用方法类似于std::thread,只不过添加了ThreadStatus for ClickHouse。ThreadFromGlobalPool的核心方法为他的构造函数。在创建ThreadFromGlobalPool对象时,同时也向GlobalThreadPool提交了job(方法scheduleorThrow中会调用上面讲到的scheduleImpl方法,从而将任务提交到线程池中去)

1
2
3
4
5
6
7
8
9
10
11
12
13
14
15
16
17
18
19
20
21
22
23
24
25
26
27
28
29
30
template <typename Function, typename... Args>
explicit ThreadFromGlobalPool(Function && func, Args &&... args)
: state(std::make_shared<Poco::Event>())
, thread_id(std::make_shared<std::thread::id>())
{
/// NOTE: If this will throw an exception, the destructor won't be called.
//scheduleOrThrow中的参数为lambda表达式
GlobalThreadPool::instance().scheduleOrThrow([
thread_id = thread_id,
state = state,
func = std::forward<Function>(func),
args = std::make_tuple(std::forward<Args>(args)...)]() mutable /// mutable is needed to destroy capture
{
auto event = std::move(state);
SCOPE_EXIT(event->set());

thread_id = std::make_shared<std::thread::id>(std::this_thread::get_id());

/// This moves are needed to destroy function and arguments before exit.
/// It will guarantee that after ThreadFromGlobalPool::join all captured params are destroyed.
auto function = std::move(func);
auto arguments = std::move(args);

/// Thread status holds raw pointer on query context, thus it always must be destroyed
/// before sending signal that permits to join this thread.
DB::ThreadStatus thread_status;
std::apply(function, arguments);
});

}

参考文献

[1] https://tech.meituan.com/2020/04/02/java-pooling-pratice-in-meituan.html

Hadoop

Hadoop Map-Reduce模型

Hadoop的整体计算数据流如下图所示:MapReduce 编程模型将计算过程分为两个阶段 Map和Reduce,这两个阶段都接受key-value元组作为输入。用户一般通过指定map和reduce两个函数即可,其他的交给Hadoop框架。

Hadoop将整个输入分为固定大小的块(input split)来作为
每个Map任务的输入,也就是说针对每一个input split启动一个map task,而且常常split的大小与Hadoop分布式文件系统HDFS的block大小(128M)是相等的。这个是可以通过参数来配置的。split的大小一般设置为hdfs的block大小是因为,在大数据系统中,相对移动数据和移动程序,移动数据的开销比较大,因此通常会将map任务调度在拥有split的那个节点中运行(data locality),而如果split的大小多于1个block,不能保证节点中都拥有这两个文件block,那么这个map task
无论运行在哪个节点都需要跨节点传输数据。但是有时候因为如果这个节点因为运行了其他task,并不能满足data locality,则Hadoop会尽量将map调度在和数据在的那个节点同一个机架的另一个节点中来尽量较少数据传输的开销。
map task的输出仍然是key-value,但是reduce task的输入要求从每个map task 拷贝来得数据都是有序的,这一将map的输出转化为reduce task输入的过程称为shuffle。最终有reduce将结果写入到HDFS系统中,而map的输入作为中间结果则并不是直接写入到HDFS,而是写入本地磁盘(因为map task的输出是中间结果,最终整个job完成还是需要删除的。而且可能会失败,如果写入到hdfs,重新调度失败的task,不但任务要重做还要删除hdfs中的数据,hdfs中的block是有三副本的,因此写入开销比较大)。

具体的Map-Reduce过程如下图所示。map将输入split处理后的结果写入磁盘等待reduce task
来拷贝,这里注意的是如果有多个reducer,那么每个map task的输出需要进行partion和sort操作(具体过程见Shuffle and Sort)。partion可以理解为对map的输出中的key进行划分,确保同一个key被分到同一个partion,而每个partion可以拥有多个key。每个partion对应于一个reducer,等全部map task完成后,对应partion的reducer会来取对应partion的数据。每个partion中的所有数据时根据key排序好的。途中表示的为三个mapper和2个reducer因此,每个mapper的输出被分为两个partion。具体的sort和partion过程,以及数据的存放形式见Shuffle and Sort。

shuffle and Sort

1
2
3
MapReduce makes the guarantee that the input to every reducer is sorted by key.
The process by which the system performs the sort—and transfers
the map outputs to the reducers as inputs—is known as the shuffle

map task中的输出结果首先写入到circular memory buffer,默认大小为100M,buffer的大小也可以通过参数配置。当buffer中内容达到了某个阙值,会有后台线程会将buffer中的数据写入到文件(本地磁盘),map 输出到buffer和buffer数据读出到文件时同时进行的,除非buffer中已经满了,那么map会阻塞直到后台程序将所有数据写入到文件。后台程序在将
buffer数据写入到文件之前会首先对数据进行partion,而且会对每个partion在内存中进行排序,如果定义了combiner则会执行combiner函数。每次buffer达到阙值之后,后台线程都会写入到一个新文件,所以当map task的输出写完后,会有多个split file。这个split file 是分区有序的,即在每个分区内,数据都是根据key排好序的。在map task完成之前,所有的spil files会被merge成一个分区有序文件。在合并期间可能还会执行combiner函数来减少写入磁盘的数据。如果spile file太少可能就不执行combiner函数(对每个split file执行combiner函数)了,因为考虑到执行combiner函数也有开销,文件太少不值得。

每个reducer需要跨节点来请求map task的输出。为了尽快完成数据拷贝,每当有一个map任务完成,reducer都会去获取数据(多线程)。map的任务完成后会通知application master(YARN中会讲到,applicatinn master是监控任务的执行情况),而每个reducer会有后台线程不断的去询问applicaton master是否有map完成并获取map输出文件位置。拷贝来的数据首先写入到
内存buffer,这个buffer大小可以设置,通常比较大,因为shuffle阶段,reduce无法进行。
当内存buffer中数据达到某个阙值(默认0.8)则类似于map阶段,溢出到文件。则最终也会在磁盘生成多个split file如下图所示。当磁盘中有多个split file,会有后台线程去merge这些文件。磁盘merge和内存merge是同时运行的(merge1和merge2)。最后一轮merge(merge3)通常是来自内存和磁盘,从而减少一次读写文件。最终生成一个最终的排序文件作为reduce的输入。

1
2
This final merge can come from a mixture of in-memory and
on-disk segments.

combiner

许多 MapReduce 作业受到集群上可用带宽的限制,因此尽量减少在 map 和 reduce 任务之间传输的数据是值得的。 Hadoop 允许用户指定要在map的输出上运行combiner函数,combiner函数的output 形成 reduce 函数的输入。 因为combiner函数是一种优化,所以 Hadoop 不保证它会为特定的map输出调用多少次。换句话说,调用combiner零次、一次或多次都不影响最终reducer的输出。
举个Hadoop权威指南的例子(年份,温度),map-reduce job为找到每年的最高温度。
第一个map产生输出(1950,0),(1950,20),(1950,10)
第二个map产生输出(1950,25),(1950,15)
如果没有combiner函数那么最终reducer的输入为((1950, [0, 20, 10, 25, 15]))
如果本例中combiner函数和reduce函数一样,那么reduceer 的输入为(1950, [20, 25]),
从而减少了map到reduce的数据拷贝。

YARN

Apache YARN(Yet Another Resource Negotiator),是一个资源管理系统。YARN在Hadoop2中被引入,因为在Hadoop1中的jobtracker背负了太多的任务,比如资源调度,task监控。引入YARN将部分任务分离出来。
Yarn的核心组件包括两个长久运行的守护进程,resource manager和node manager。 resource manager每个集群只有一个,node manager每个机器一个。
Container : 抽象的资源包括内存,cpu等。

向yarn的请求资源的流程为上图所示。首先客户端向resource manager提交job(step1),资源管理器会首先联系某个NodeManager启动一个Cotainer来运行application master(step2a和step2b),application master运行的程序根据不同的上层应用而不同。如果本节点的container满足了程序的要求,那么无需申请更多container,否则该applicatin master会
向resource manager请求跟多container(step3),然后会联系其他的node manager进行分布式计算(step4a,step4b)。具体的以Hadoop提交map-reduce作业为例详细解释,如下图所示。

首先MapReduce程序会向resoure manager请求一个应用程序ID(step2),map-reduce客户端也会检查job的合法性,比如输入文件和输出文件是否存在,如果不合法(比如输入文件不存在,输出文件已经存在)则直接报错。注意job的input spile也是在这里计算的。最后需要将job所需要的资源比如job jar文件,配置文件,计算好的input spiles(应该只是一个划分信息,并不是真正的数据)等等信息拷贝打包发送给资源管理器来提交job(step4)

resource manager收到job后,其中调度器会处理这个请求然后分配一个container,resource manager会通知对应节点的node manager来这个container来运行MRAppMaster程序,该程序主要是监督job的完成情况,会创建一系列的bookkeeping 对象来维护跟踪job的进度。接着会创建获取input split,然后创建一系列的mao和reduce task对象。application master需要决定如何运行这个job,如果这个job比较小,那么applicaion master 会在自己的几点上运行整个job,否则application master 会向resource manager请求containers来运行这些map和reduce task(step8)。map请求优先级会高于reduce,因为只有全部的map task完成才会进入reduce task的sort阶段。在资源请求得到满足后,application master 会向对应的node mananger发送信息来启动container,这里的container执行的main class 为YarnChild,并由YarnChild来执行task,执行task之前。
YarnChild会获取执行这个task的相关资源(step10),最后运行map或者reduce task(step11)。

参考文献

[1] White, Tom. “Hadoop-The Definitive Guide: Storage and Analysis at Internet Scale. 4th.” (2015).

[2] https://andr-robot.github.io/Hadoop%E4%B8%ADShuffle%E8%BF%87%E7%A8%8B/

RDD

RDD是一个只读的分区的数据集合,可以通过两种方式来生成

  1. data in stable storage,例如HDFS
  2. other RDDs,通过对已经存在的RDD经过transformations操作,比如map,filter,join等。
    需要注意的是,RDD中不一定含有物理数据,RDD只是包含了一些信息,利用这些信息我们可以从reliable storage中的数据重新计算这个RDD。

RDD的实现

每个RDD对象实现了同一个接口,接口中含有下列操作(接口名字只是示意功能,具体spark实现的接口名字并不一定如此)

1
2
3
4
5
getPations 返回RDD所有partion的ID
getIterator(partition) 获取某个分区的迭代器,进而可以访问整个partion数据
getPreferedLocations(partiton) 指导task调度时尽量满足data locality.
getPartitioner() 返回元数据表明RDD是否是 hash/range partitioned
dependencies() 返回依赖的父RDD

比如HDFSTextFile,getPations方法返回的是其数据对应的HDFS的块ID(隐含着每个partion对应一个HDFS block),getIterator 返回一个数据流来读这个block。再如MappedDataSet的partitions和preferred locations跟他的parent RDD是相同的,但是他的iterator会将map function应用到parent RDD的每一个元素。

依赖的表达

依赖分为两种,narrow dependency和wide dependency,如下图所示。窄依赖指,子RDD的每个partition仅仅依赖父RDD的一个partition,简而言之,父RDD的partition和子RDD的partition存在一一对应的关系。比如常见的map和filter操作。宽依赖指父RDD的每个patrition可能被子RDD的多个partition使用。形象的可以说,从父RDD角度来看,父RDD指向子RDD的箭头为一个则为窄,多个则为宽。

RDD操作

RDD操作分为transformations和actins,transformation从一个已经存在的RDD生成一个新的RDD。Actions会触发在RDD上的计算并处理返回的结果,例如返回给用户或者保存到到持久存储。
Action是immediate effect的,而transform是lazy的,意思是spark程序中只有遇到action才会执行之前定义的一系列tranform进行实际的计算。一般的RDD操作如果返回的是一个新RDD,那么是一个transformation操作,否则是一个action。总结如下,图来自[1]。

Shared Variables

Spark程序可能经常会需要获取非RDD数据,比如Hadoop权威指南[3]中的例子,如下所示

1
2
3
val lookup = Map(1 -> "a", 2 -> "e", 3 -> "i", 4 -> "o", 5 -> "u")
val result = sc.parallelize(Array(2, 1, 3)).map(lookup(_))
assert(result.collect().toSet === Set("a", "e", "i"))

虽然工作正常,但是这样lookup的数据会被scala程序序列化成closure的一部分,没有效率。

Broadcast Variables

broadcast variable会被序列化然后发送到每个executor(可以理解为worker节点)中去,然后会被cache,所以在这个executror中执行的task都可以直接获取他。而像上述所说的普通变量序列化为闭包的一部分,则每个task都需要通过网络传输一次这个变量数据。Broadcast variable不可改变。如果需要改变则需要Accumulators。

Accumulators

一个Accumulators是一个共享变量,但是只能故名思议只能累加,类似于Map-Reduce中的counters。

Spark job run

spark的job调度分为两个层面,一个是DAG scheduler将linage graph划分为stages,
在每个stages,又有task scheduler根据每个execturor的情况进行task的调度,基本原则就是data locality。这里主要讲下DAG Scheduler划分stage的原则。
上述讲过RDD的依赖有窄依赖和宽依赖,对于窄依赖而言,可以每个partition分配一个task来进行计算并将结过输出到一系列新的分区中,此过程类似于Map-Reduce中的Map side,因此这样的task被称为Shuffle map tasks。而宽依赖因为依赖父RDD多个分区,在进行下一步的计算之前需要一个shuffle过程。而这个shuffle过程就成为了分割stage的分割线。如下图所示。

分为三个stage,stage1和stage2均是窄依赖,而join操作是宽依赖,因此在进行join操作之前需要一个shuffle过程。至于为什么要划分stages,个人可能是每个stage中都是窄依赖,可能有利于
流水线的执行和优化。

参考文献

[1]Zaharia, Matei, et al. “Resilient Distributed Datasets: A {Fault-Tolerant} Abstraction for {In-Memory} Cluster Computing.” 9th USENIX Symposium on Networked Systems Design and Implementation (NSDI 12). 2012.

[2]Zaharia, Matei, et al. “Spark: Cluster computing with working sets.” 2nd USENIX Workshop on Hot Topics in Cloud Computing (HotCloud 10). 2010.

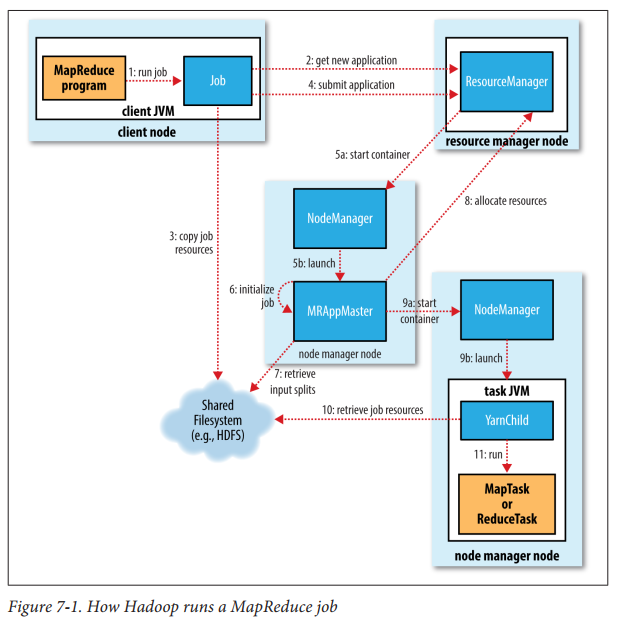
[3]White, Tom. “Hadoop-The Definitive Guide: Storage and Analysis at Internet Scale. 4th.” (2015).

[4]https://www.studytime.xin/article/spark-knowledge-rdd-stage.html

[5]https://wongxingjun.github.io/2015/05/25/Spark%E4%BD%9C%E4%B8%9A%E8%B0%83%E5%BA%A6%E4%B8%ADstage%E7%9A%84%E5%88%92%E5%88%86/